


Wood vs Vinyl Fence Installation in San Diego – Which is Better?
May 12, 2025
How a Flooring Company in San Diego Can Help You Choose Between Hardwood and Engineered Wood Flooring
May 22, 2025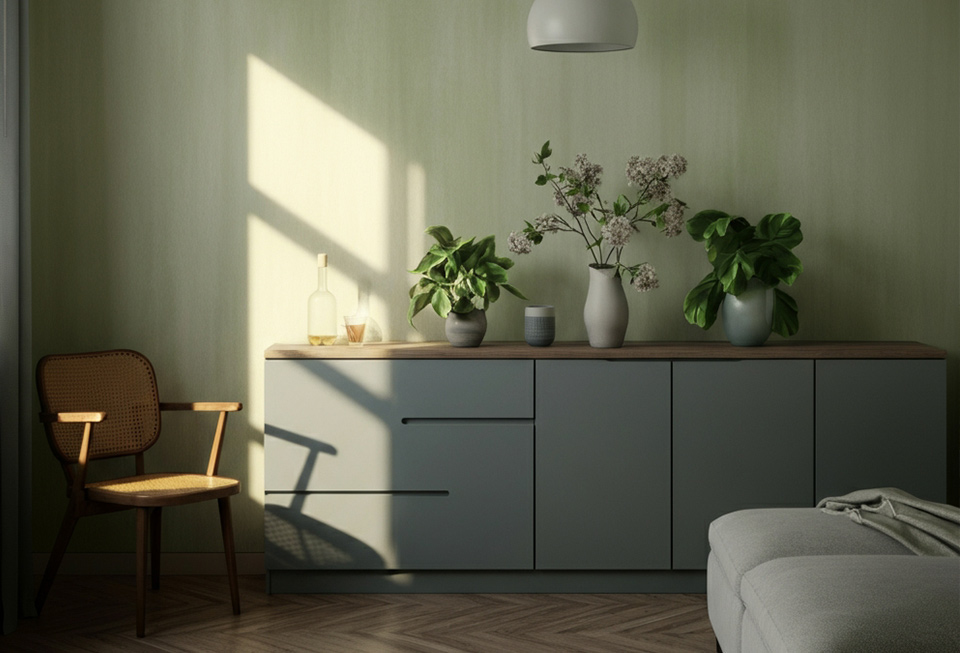
If you’ve been scrolling through Pinterest or watching home renovation shows lately, you’ve probably seen the dreamy, soft walls that look straight out of a European countryside cottage.
That hazy, cloudlike finish isn’t your average wall paint—it’s limewash paint, and it’s making a serious comeback in American homes.
The great thing about limewash is that it’s not just beautiful—it’s also one of the oldest, most sustainable finishes out there. It’s been used for centuries in Europe and the Middle East, and now it’s popping up in everything from New York lofts to farmhouse-style kitchens in the Midwest. It’s earthy, breathable, eco-friendly, and has a finish that’s impossible to replicate with regular paint. It’s also surprisingly beginner-friendly, as long as you know the basics and take your time.
So, whether you’re planning to update your fireplace surround, refresh an old brick wall, or bring some depth to your living room walls, this guide will walk you through everything you need to know to apply limewash paint with confidence.
1. What is limewash paint, and why is everyone talking about it?
Limewash paint is made from slaked lime—a fancy name for limestone that’s been crushed, burned, and mixed with water. The result is a milky white paste that turns into a smooth liquid paint when thinned with more water. Once applied to a surface, limewash absorbs into the material and then slowly reacts with carbon dioxide in the air. This reaction creates a thin layer of calcium carbonate, which hardens over time and gives limewash its unique soft texture.
What really makes limewash paint special is its depth and variation. Instead of a flat, one-note finish, you get layers of tone and texture that shift subtly with the light. It’s almost like watercolor for your walls. No two applications look the same, which is part of the charm.
Limewash also breathes. That means moisture can pass through it, which makes it perfect for older homes where walls need to “exhale” to avoid mold buildup. And because it’s made from natural materials, it doesn’t give off any harsh fumes, making it a great option for people with allergies or sensitivities to chemicals.
2. How is limewash paint is different from regular paint?
Regular interior paint, like latex or acrylic, forms a film on top of the wall. It creates a sealed barrier designed to be scrubbable, glossy, or matte, but doesn’t interact with the surface. Limewash, by contrast, is absorbed into the wall. It becomes one with it. It soaks into porous surfaces and leaves behind a matte, mineral finish that looks like it belongs there, not like it was rolled on last weekend.
Because of this difference, limewash looks more alive. The slight streaks, the movement, and the irregularity of the finish are all part of its natural beauty. It’s not going to give you that crisp, uniform look that latex paints do—and that’s exactly why so many people love it.
3. Why should I use limewash for your home?
Limewash adds instant character. It makes a new wall feel old in the best way possible. If you’re drawn to European design, vintage aesthetics, or the wabi-sabi concept of beauty in imperfection, limewash fits right in. It softens sharp corners, mutes bright colors, and creates a cozy, textured atmosphere without being overwhelming.
Beyond the aesthetics, limewash is a smart choice for people who want eco-conscious options in their home. It’s non-toxic, made from natural materials, and doesn’t emit volatile organic compounds (VOCs). It’s also naturally mold-resistant, antibacterial, and odorless once dry.
It’s ideal for accent walls, fireplaces, bedrooms, bathrooms (with proper ventilation), and even some exterior walls if you want to bring that Tuscan villa vibe to your backyard.
4. What surfaces work best with limewash?
Limewash paint really shines on naturally porous surfaces. Think brick, stone, cement render, stucco, and bare plaster. These materials allow the limewash to soak in and bond with the surface, which is key to its long-lasting, chalky finish. It’s not like regular paint that just sits on top—it needs to be absorbed.
Now, if you’ve got drywall, it can work, but only if it’s completely unpainted. If it’s already been coated with a latex or oil-based paint, you’ll need to prep it properly. That means using a mineral-based primer or bonding agent to help the limewash stick. Without that, it might flake off, and no one wants that after all the effort.
Got glossy or sealed surfaces like wood, metal, or plastic? Sorry, limewash isn’t a great match. These materials just don’t let the lime soak in. Even if you sand or etch the surface, the results can be unpredictable. If you’re determined to use limewash on these, be prepared for some serious prep work and still no guarantee it’ll hold up long-term.
5. What tools will I need?
One of the best things about limewash—aside from how stunning it looks—is that you don’t need a garage full of gear to get started. In fact, it’s refreshingly low-tech. You can skip the rollers, skip the fancy sprayers, and skip the expensive paint machines. This is a back-to-basics project, and that’s part of the charm.
Your MVP? A big natural-bristle masonry brush. These chunky brushes are specifically designed for textured surfaces and wide strokes. They’re what gives limewash that dreamy, cloudy finish with soft variations in tone and texture. Unlike synthetic brushes (which tend to drag and leave sharp lines), natural bristles hold more product and help create those soft, painterly effects that make limewash unique.
If you’re standing in the hardware aisle wondering which one to get, look for something labeled for masonry or lime-based paints—it’ll be wider and rougher than your typical wall brush. And yes, it’ll probably feel like something you’d use to paint a barn, not a living room. That’s exactly what you want.
Here’s what else you’ll want to gather before you get going:
- Painter’s tape – Use this to protect trim, light switches, outlets, and edges where your wall meets the ceiling or floor. Limewash is splashier than regular paint, so a little tape goes a long way in keeping things tidy.
- Drop cloths – Limewash is thin and drippy, especially when watered down for that first coat. Lay down drop cloths (or old sheets if you’re in a pinch) to protect your floors and furniture. It can leave a white residue if it dries on something it’s not supposed to.
- Gloves – Even though limewash isn’t toxic, lime is naturally alkaline and can dry out or irritate your skin, especially if you’re mixing your own from powder. A good pair of disposable gloves keeps your hands comfy and saves you from scrubbing lime crust out from under your nails later.
- Water mister or sponge – Limewash needs a slightly damp surface to bond properly. Use a water spray bottle or sponge to lightly moisten the wall before each coat. This helps with absorption and gives you a more even finish. Just remember—damp, not dripping.
- Safety goggles – If you’re mixing up your own limewash from hydrated lime and water, goggles are a must. Lime dust can irritate your eyes and lungs, and it’s just not worth skipping the safety gear. A dust mask or respirator is also a good idea during mixing.
- Stir sticks or a paint paddle – Limewash tends to settle quickly, especially the pigment. Give it a good stir every 10–15 minutes during application to keep the consistency nice and even.
- A bucket or mixing tub – If you’re not using a pre-mixed version, you’ll need something to mix your limewash in. A sturdy plastic bucket or a painter’s tub works well. Don’t use anything metal unless you’re sure it’s lime-safe—lime can react with some metals over time.
- Ladder or step stool – Walls are tall, and limewash doesn’t really work in a “just roll it on and walk away” kind of way. You’ll want to get up close and personal with your wall, so have something sturdy to stand on to reach the higher spots comfortably.
Optional but handy:
- A small natural brush – For tighter corners, trims, or tricky spots behind radiators, a smaller version of your big brush helps you get into all the nooks without messing up the flow of your finish.
- A clean rag or sponge – Helpful for softening any harsh brush lines or catching drips as you go.
The beauty of this list? Once you’ve got these tools, you’re set for any limewash project, from a fireplace makeover to a full feature wall. It’s low-cost, low-fuss, and super satisfying to do yourself.
Take your time, prep your space well, and embrace the process. Limewash isn’t about perfection; it’s about character, and the right tools help bring that to life.
6. How do I get the surface ready?
This step might feel boring, but it’s absolutely essential. Limewash paint won’t bond properly to dirty, flaky, or greasy walls. So give your surface some love. Wipe down the walls with a damp cloth and mild detergent. Get rid of cobwebs, grease marks, or any loose particles that could stop the lime from soaking in evenly.
If your wall has cracks or holes, patch them up using a mineral-based filler. Steer clear of your usual spackling paste, it’s often too smooth or non-porous for limewash to stick to properly.
And remember, if your surface has already been painted, don’t skip the mineral primer. It creates a breathable, porous layer that limewash can grip onto. This is key for avoiding flaking and uneven finishes.
7. How should I mix the paint?
Using a ready-made limewash paint? Easy. Just follow the dilution instructions on the bucket. Most brands recommend watering it down with about 20–30% water for the first coat. This helps it soak in nicely and gives you that soft, cloudy look. Stir it well before using. You don’t want clumps or overly thick spots.
If you’re feeling a bit more adventurous and want to mix your own limewash from lime putty or hydrated lime and water, be ready for a bit of chemistry. You’ll need to slake the lime ( mixing it with water and letting it rest for a day or so). This process neutralises the lime and makes it safe to apply. It’s old-school and incredibly rewarding, but if you’re new to lime, pre-mixed is probably the safer (and faster) option.
8. How should I perform a test path?
Don’t skip this. Seriously.
Even if you’re 100% sold on your colour, always do a test patch first. Pick a small, hidden section of your wall and apply one coat. Let it dry for at least 24 hours. Limewash can look dramatically different once it’s dry. It usually lightens, and the texture of the wall can shift the colour tone more than you expect.
This patch also helps you figure out:
- How many coats you need
- Whether you like the finish
- How the wall absorbs the product
Think of it as your safety net. It’s way better to catch issues on a small patch than halfway through the living room wall.
9. How should I apply the first coat?
Start by misting your wall with a little water. You want it damp, not drenched. This slows down the drying time and helps the limewash absorb more evenly, reducing brush marks and patchiness.
Now dip your brush in and start painting in big, loose crisscross strokes. Limewash paint isn’t about perfection, it’s about movement and depth. Embrace the streaks and soft edges. It might look a bit wild after the first coat, but that’s part of the charm.
Your wall will probably look uneven and even blotchy at this point. Don’t panic. This is totally normal. It starts to even out with additional coats.
10. How long should I wait between coats?
Here’s where the magic starts to happen—and where a little patience goes a long way. Limewash paint isn’t like your standard paint that dries in a couple of hours and is ready to go. It needs time to settle in, cure, and do its thing. You’ll want to give it at least 24 hours between coats. That might feel like forever when you’re excited to see the final result, but trust us, rushing it can lead to a patchy finish or even peeling later on.
How do you know it’s ready? Give the wall a gentle touch. If it still feels cool, damp, or even a little tacky, give it more time. Depending on your climate, drying time can vary, especially if it’s humid or cold.
When you’re ready for the next round, mist the surface again with water. Don’t skip this step as it helps the new coat absorb better and reduces the risk of visible brush lines. Apply your second coat using those same big, crisscrossing strokes. Try not to overthink it. Limewash works best when it’s loose and organic. Embrace the streaks and the depth they bring.
Each coat adds more richness, texture, and colour variation. For most indoor walls, two coats are usually enough to get that beautiful, chalky look with soft movement. But if you’re working with something ultra-porous like raw brick, textured cement, or aged stucco, a third coat might be needed to even things out and deepen the tone.
Remember, limewash paint isn’t just paint—it’s more like a skin for your wall. It bonds with the surface and becomes part of it. Give it the time and respect it deserves, and you’ll be rewarded with a timeless, natural-looking finish that gets better with age.
Optional finishing touch: Sealing (if needed)
For most indoor spaces, you can skip sealing altogether. One of the best things about limewash is how breathable it is—it naturally helps prevent mould and mildew because it allows moisture to escape rather than trapping it inside your walls. That’s part of what makes it so popular in older homes and stone buildings.
But there are a few cases where a breathable sealer might come in handy. If you’re using limewash in areas that get a lot of splashes, scuffs, or steam, like bathrooms, kitchens, or hallways, you might want to add a topcoat just to give the surface a bit more resilience. The key is to use a breathable, lime-compatible sealer. These are designed to protect the wall without sealing it like a plastic wrap.
That said, be careful. Some sealers can darken the colour or give the wall a sheen, which kind of defeats the purpose if you’re going for that soft, matte, old-world finish. Always do a test patch in an out-of-sight corner to see how it reacts with your limewash. What looks perfect in the tin might behave very differently once it hits your wall.
And if your space doesn’t see much wear and tear? Skip the sealer and let the limewash do what it does best: breathe, patina, and evolve.
Wrapping it all up
Limewashing is less about following strict rules and more about letting the material work its natural charm. It’s not about getting a perfectly smooth, even finish; it’s about texture, tone, and that beautifully lived-in look that feels like it’s been part of your home forever.
It takes more time and patience than regular paint, but the payoff is worth it. You get a finish that’s soft, breathable, eco-friendly, and full of character. Plus, the more you work with it, the more confident you’ll get. It becomes a bit addictive once you realise how much personality you can bring to a wall with just a brush, some water, and a bucket of limewash.
So whether you’re jazzing up a fireplace, giving your bedroom walls a calming refresh, or tackling an exposed brick wall in your kitchen, limewash can transform the space without feeling overdone.
Take your time, enjoy the process, and don’t be afraid to get your hands dirty. That’s all part of the charm.
When is it a good idea to call in a professional?
While limewashing can be a fantastic DIY project, there are definitely times when it’s worth hiring a pro. If your walls are in rough shape, if you’re dealing with historic materials, or if you’re trying to limewash a whole house exterior, it’s probably smart to bring in someone with experience.
Professionals know how to mix lime correctly, how to prep complicated surfaces, and how to apply the finish so it looks consistent across different materials. They’ll also have access to higher-quality tools and may be able to source more refined limewash products than what’s available at big-box stores.
If you’re after that high-end look you’ve seen in magazines, calling a professional might be the difference between “eh, looks fine” and “wow, this is stunning.”
Why limewash paint is worth the effort
Limewash paint is more than just a finish, it’s a statement. It tells a story, adds warmth, and transforms bland walls into living surfaces that evolve. Whether you’re restoring a historic home or just want a cozy upgrade, limewash offers a natural, breathable, and beautiful option.
With the right prep and a little patience, it’s a DIY project, but if you want perfect results or you’re dealing with tricky surfaces, don’t hesitate to call in a pro for limewash painting in San Diego. Either way, your walls are about to look a whole lot more interesting.
Frequently Asked Questions
Below are some commonly asked questions to consider:
Can limewash paint be used on furniture or cabinets?
Limewash isn’t ideal for furniture or cabinetry because those surfaces tend to be touched and cleaned frequently, which can wear the finish down quickly. It also doesn’t bond well to non-porous or sealed wood. While some DIYers experiment with limewash on vintage pieces for a rustic look, the finish is delicate and not suited for high-traffic or functional areas like kitchen cabinets or dining tables.
How does limewash paint hold up in humid climates like the Southeast or Pacific Northwest?
Limewash is naturally breathable, so it performs well in humid climates when applied correctly on porous surfaces. In fact, its ability to allow moisture to escape makes it less prone to trapping dampness behind walls. However, in areas with extreme humidity or heavy rainfall, especially on exteriors, it may require more frequent maintenance or touch-ups.
Is limewash compatible with historic preservation guidelines
Yes, in many cases, limewash is approved for use on historic buildings. Because it’s traditional, breathable, and reversible (with effort), it’s often favored in restoration projects. If you’re working on a historically registered home, it’s best to check with your local preservation board or historical society before proceeding, just to ensure compliance.
Can I apply limewash over a textured wall?
You can apply limewash over textured walls like skip trowel or knockdown, and the results can be quite beautiful. The paint will settle into the crevices and highlight the texture, adding depth and variation. Just make sure the wall is clean and either unpainted or primed with a mineral-based primer to ensure proper adhesion.
Does limewash protect the wall from water or stains?
Limewash isn’t waterproof or stain-proof. It’s breathable and can repel moisture, but it won’t stand up to direct splashes, heavy rain (if unsealed outdoors), or grease stains. In kitchens or bathrooms, consider using it in areas away from sinks and stovetops, or apply a breathable sealer if you need extra protection, keeping in mind this may slightly change the look of the finish.


